 First, you need 30 square shaped papers. Copypaper thickness is fine. And they need to be exact squares and you need to be meticulous with your folding. Otherwise your star will end up wonky.
 Fold it in half. Simple
 Fold it in half again in the other direction. Simple
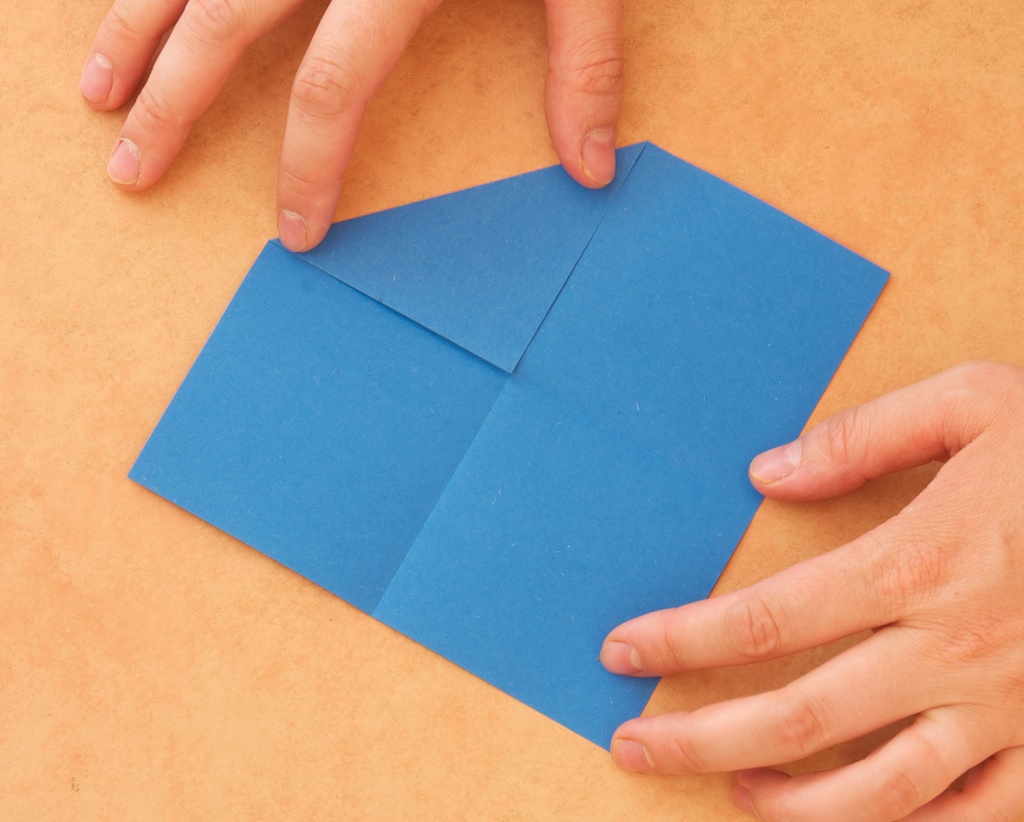 Fold one corner to the center. Are you following me on this?
 Do it for the opposite corner, too.
 Now flip the paper over. Look at my right hand in the upper left corner: the middle finger is on the folded line and the index finger is on the fold you just did on the previous step. Now you need to fold that fold underneath the index finger onto the line that the middle finger is pointing at. Yeah, a bit tricky to explain.
 Hopefully your paper looks like this now. (Edit: Here folded edge of the paper is folded on the horizontal fold line. You can do it either on the horizontal or vertical fold line, but make them all the same. Otherwise you'll end up with mirror image modules that can not be joined!)
 Repeat the fold on the opposite side of the paper.
 Flip the paper around again. Now my middle and index fingers of my right hand in the upper left corner of the photo are pointing at two corners of two different folds. Your next fold line will be between these two corners.
 Ta-dah! Like this. Hopefully your paper looks the same.
 And once again repeat the fold on the opposite side.
 Flip the paper over one more time. Now you fold the small piece sticking from underneath over the paper.
 Do it on the opposite side again.
 Then fold the whole thing in half. This is your building block.
 Now repeat it 29 times. This is tedious, but you'll learn the folds pretty quickly. Using different colours helps especially the first time in the final stages.
 Each point of the star is made up of three modules. Open the folds on one half of the module and slip it into the "pocket" of another module. (Edit: here the folds open to the left. If you have modules where the folds open to the right, it doesn't matter, just as long as they all open in the same direction. If you have mirror image modules, see above the previous edit.)
 Like this.
 You can see the joining of the blue and green modules more clearly in this pictures. You need a third module (red in this picture) for the point of the star. Join it the same way.
 And then turn the remaining part of the red module around the blue module to form a star point.
 And then slip the red module into the "pocket" of the blue one. This is a bit tricky, but it can be done without tearing the paper. The first point is ready!
 Now make two rosettes of five points, joining the modules in a similar fashion. You will need 10 modules for each rosette. Next to each point there is a "loose" end of a module (red, orange, blue, green and fuchsia).
 Now take one of the five-point-rosettes (you're making this into a 10-point rosette) and add one module to each of the loose ends (you'll need 5 modules to do this). Compare the pictures of the rosettes and this pictures. I've added (going clockwise) a purple module to the red loose end, orange to the blue, red to the green, light blue to the fuchsia and yellow to the orange loose end. So now you have the original five-pointed rosette and next to these points are points that are 2/3 ready and then the loose ends (purple, orange, red, blue and yellow). At this point you have used 25 modules and you should have 5 left. Unfortunately I don't have pictures between this stage and the complete star. I was getting frustrated late in the evening when things weren't working out and I just wanted to get the star done.
Now you use one module to join the 2/3 ready point and the loose end one resulting in a point and 2/3 ready point. In the above picture, lower left corner, you would join the purple (loose end) and orange-yellow 2/3-ready to form a point of orange-yellow-and-whichever-colour-module-you-used-to-join-them. Now you should have four modules left to join the rest four 2/3 ready point and loose end. It's a bit difficult to explain this, I hope you're not completely lost.
When you have used all 20 modules, you should have a 5-point rosette with 5 loose ends (using 10 modules) and a 5-point rosette surrounded by another 5 points and 5 points that are 2/3 ready (10-points, built with 20 modules). Put these two parts facing each other and joint the loose ends in the 5-point rosette with the 2/3 ready points in the 10-point rosette).
 I hope you have something like this in your hand and that your bloodpressure is down! Let me know if you need further instructions!


